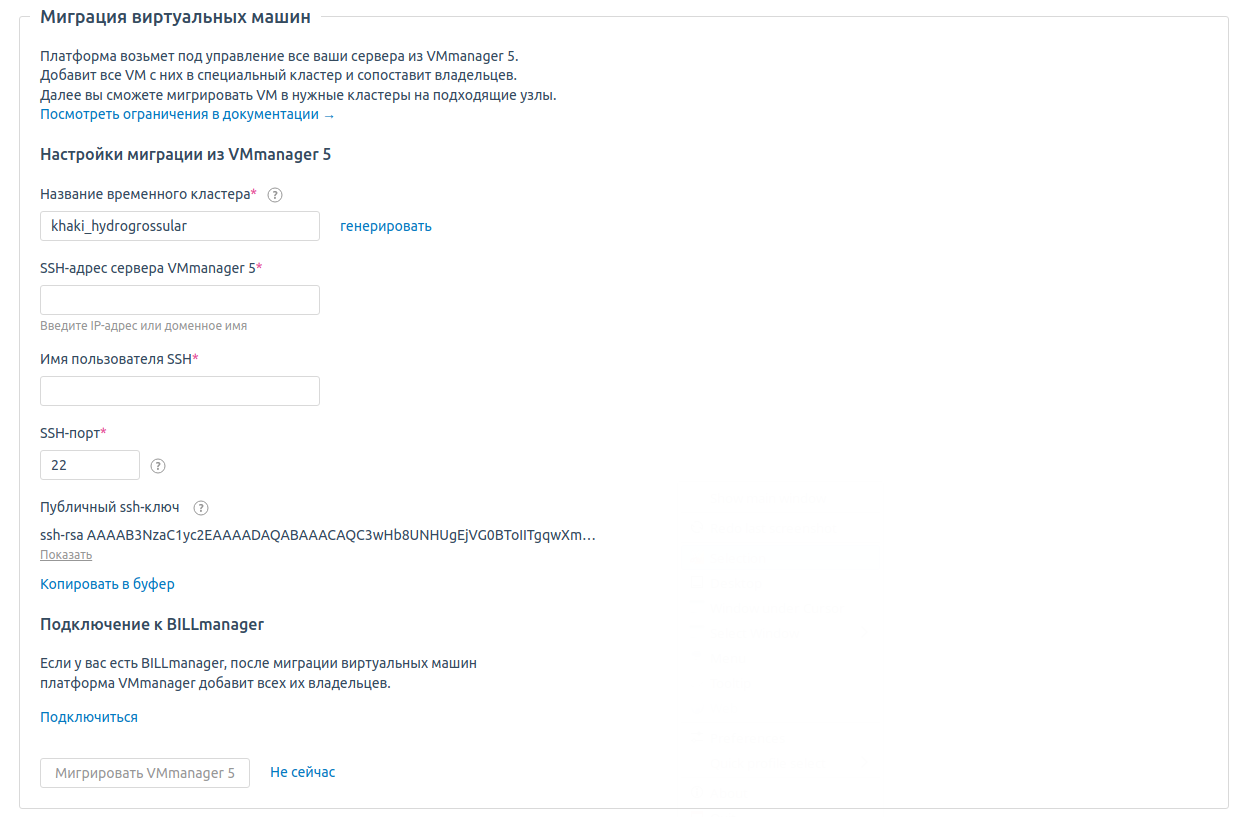
Для миграции VM5 на VM6 вам в документацию нужно добавить информацию, что при миграции с CentOS 7, нужно внести изменения в Libvirt
cat /etc/sysconfig/libvirtd | grep LIBVIRTD_ARGS
Пример ответа
#LIBVIRTD_ARGS=”–listen”
Если строка LIBVIRTD_ARGS=”–listen” закомментирована:
nano /etc/sysconfig/libvirtd
для ОС CentOS 7 — раскомментируйте её:
LIBVIRTD_ARGS="--listen"
AND
CHANGE
nano /etc/sysconfig/iptables
add on line
после
-A INPUT -p tcp -m tcp –dport 8081 -j ACCEPT
добавьте
-A INPUT -p tcp -m tcp --dport 16514 -j ACCEPT
Before
systemctl restart iptables
Перевыпуск TLS
Section 1. Main Directories Involved
In a default KVM installation on RHEL 7/CentOS 7, you get the following main directories:
/etc/pki/CA where the public Certificate Authority certificate is stored,
/etc/pki/CA/private where the private Certificate Authority key is located,
/etc/pki/libvirt where the public KVM host server certificate is stored,
/etc/pki/libvirt/private where the private KVM host server key is located.
CA Certificate Generation
To create a new KVM host server certificate with a duration period of more than 1 year, you first need to create a new CA certificate:
cd /etc/pki/CA/private
Create a file called certificate_authority_template.info and paste the following lines into:
nano certificate_authority_template.info
cn = mydomain.com
ca
cert_signing_key
expiration_days = 2000
Note: By default, the expiration_days variable worths 365 (1 year). Here, we use 2000 days, ie more than 5 years.
Then, generate a private CA key:
(umask 277 && certtool --generate-privkey > certificate_authority_key.pem)
Generating a 2048 bit RSA private key…
Now, you can combine the CA template with the CA key to get the CA certificate:
certtool --generate-self-signed \
--template certificate_authority_template.info \
--load-privkey certificate_authority_key.pem \
--outfile certificate_authority_certificate.pem
Next, you need to copy the new public CA certificate to the right location with the right default name (cacert.pem):
cp -p certificate_authority_certificate.pem ../cacert.pem
Finally, you have to set the correct permissions:
chmod 444 /etc/pki/CA/cacert.pem
restorecon /etc/pki/CA/cacert.pem
KVM Host Certificate Generation
To create a new KVM host certificate, you need to copy the public CA certificate and the private CA key into the /etc/pki/libvirt/private directory:
cp -p certificate_authority_certificate.pem certificate_authority_key.pem /etc/pki/libvirt/private
Then, you need to go into the /etc/pki/libvirt/private directory:
cd /etc/pki/libvirt/private
You need to create a file called server_template.info and paste the following lines into:
organization = mydomain.com
cn = kvm
tls_www_server
encryption_key
signing_key
expiration_days = 2000
Next, you need to generate a private KVM host key:
(umask 277 && certtool --generate-privkey > serverkey.pem)
Generating a 2048 bit RSA private key…
Now, you can combine the server template with the private KVM host key to get the public KVM host certificate:
certtool --generate-certificate \
--template server_template.info \
--load-privkey serverkey.pem \
--load-ca-certificate certificate_authority_certificate.pem \
--load-ca-privkey certificate_authority_key.pem \
--outfile server_certificate.pem
Next, you need to copy the new public KVM host certificate to the right location with the right default name (servercert.pem):
cp -p server_certificate.pem ../servercert.pem
Finally, you have to set the correct permissions:
chmod 440 /etc/pki/libvirt/private/serverkey.pem
chgrp qemu /etc/pki/libvirt/private/serverkey.pem
restorecon /etc/pki/libvirt/private/serverkey.pem
chmod 440 /etc/pki/libvirt/servercert.pem
chgrp qemu /etc/pki/libvirt/servercert.pem
restorecon /etc/pki/libvirt/servercert.pem
At this point, you should be able to start the libvirtd daemon:
systemctl restart libvirtd
KVM Client Certificate Generation
Optionally, you may need to create a new KVM client certificate.
Create a new file called client_template.info and paste the following lines into:
country = DE
state = Berlin
locality = Berlin
organization = mydomain.com
cn = kvm
tls_www_client
encryption_key
signing_key
expiration_days = 2000
Then, you need to generate a private KVM client key:
# (umask 277 && certtool –generate-privkey > clientkey.pem)
Generating a 2048 bit RSA private key…
Now, you can combine the client template with the private KVM client key to get the public KVM client certificate:
# certtool –generate-certificate \
–template client_template.info \
–load-privkey clientkey.pem \
–load-ca-certificate certificate_authority_certificate.pem \
–load-ca-privkey certificate_authority_key.pem \
–outfile client_certificate.pem
Next, you need to copy the new public KVM client certificate to the right location with the right default name (clientcert.pem):
# cp -p client_certificate.pem ../clientcert.pem
Finally, you have to set the correct permissions:
# chmod 400 /etc/pki/libvirt/private/clientkey.pem
# restorecon /etc/pki/libvirt/private/clientkey.pem
# chmod 400 /etc/pki/libvirt/clientcert.pem
# restorecon /etc/pki/libvirt/clientcert.pem
Source: Libvirt website.
Certificate Expiration Date
At any time you can ask for the expiration date of a given certificate (here servercert.pem):
# certtool -i –infile /etc/pki/libvirt/servercert.pem | grep “Not After”
Not After: Thu Jul 01 11:11:49 UTC 2021
